Multi-window system
Kinovea implements a multi-window system where each opened window (instance of Kinovea) remembers its own content and state.
Multiple instances of Kinovea can run at the same time without interfering with each other. The core preferences are shared and synchronized between instances.
You can assign names to windows to associate them with specific tasks.
Note
We use the terms “window” and “instance” interchangeably in this documentation. Each instance of Kinovea has only one main window.
This system supports many use cases, for example:
Having a “go-to” reference video that can quickly be opened in separate window while working on other videos.
Associating one window with a long term research project and using a separate one for quick reviews.
Keeping a group of windows working together in a capture-and-replay workflow, and restarting them all at the same time.
Tip
It is possible to create a shortcut on the desktop to automatically open one or more specific windows, see Workspaces.
Starting new windows
To start a new window use the menu .
Reopening previous windows
When Kinovea is started it will reopen the last window that was open when it was last closed.
To reopen another window use the menu and select the desired window from the list. Alternatively use the Window manager, , and select from the list.
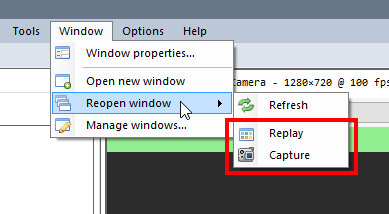
The icon next to the window name or id indicates the type of content it is hosting.
Window name
By default windows are assigned random Ids to identify them internally.
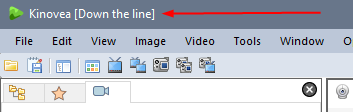
You can assign a custom name to each window by using the menu .

The name of the Window can be seen in the window title bar in square brackets.
Warning
Do not use the same name for different windows. Even though windows have internal unique Ids, the name is used in certain functions like identifying windows in the command line options or for interprocess communication.
Startup options
Each window defines startup options that are used when the window is opened.
To edit the startup options of a window use the menu .
The following options are available:
Open the file browser: The window starts on the file browser, no video or camera is loaded.
Continue where you left off: The window restores its previous content and state. This is the default option.
Open specific content: The window loads a specific video or camera, or two screens with videos and/or cameras. This option is useful if you want to create a stronger link between a window and a specific task or project. Even if you change the content or close the screens, the next time you open the window it will reload the specified content.
To assign the current content of a window to its startup option use the button Import current screens.
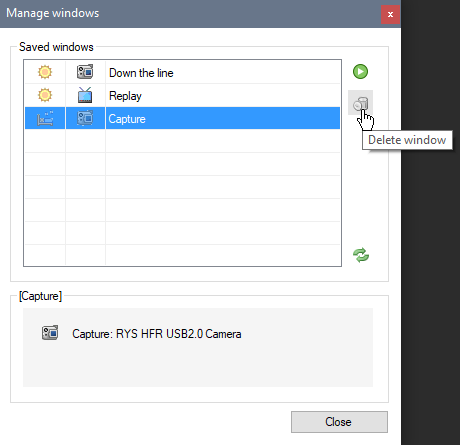
Deleting old windows
To delete old windows use the menu , select the window to delete from the list, and click the Delete button.
Tip
Window state is stored in XML files in the application data folder under the Windows subfolder. You can manually delete old window files from this folder if needed.
Global preferences vs window state
It can be helpful to understand what is saved in the core preferences and what is saved in the window state.
Everything that is modified via the menu is saved in the core preferences and shared between all windows.
This include:
The general behavior of Kinovea, language, time format, units, drawing defaults, keyboard shortcuts, etc.
The central repository of capture folders that the capture screens and replay screens reference
The list of recently opened files
The list of known cameras and their configuration
Whereas the visual content of each window and the state of the player or capture screens are saved at the window level.
This include:
The layout of the panels and other UI elements
In player screens: the speed slider and the image “stretch” state
In capture screens: the selected capture folder, the output file name, the live delay and maximum duration, the post-recording command.