Capture screen user interface
The capture screen is divided in the following areas:

At the top:
The Infobar contains information about the connected camera and streaming performances.
The Context bar has drop downs of context variables to tag the captured files.
The Quick status band gives a visual indication of the current status for recording.
In the middle:
The Camera viewport is where the camera image and drawings are visible.
At the bottom:
The Annotation toolbar contains drawing tools usable on the capture screen.
The List of recently captured files displays thumbnails of the files recorded in the session.
The Capture controls area has buttons to configure the camera, pause or restart the stream, switch between live and delayed view, arm and disarm the capture trigger, save an image, and start/stop recording.
The Delay and duration area controls the delay of the stream and the duration of recordings.
The Output folder and file name area lets you pick the output folder and define the file naming pattern of recorded files.
Infobar
The infobar contains information about the connected camera and streaming performances.

The first part of the infobar displays the alias of the camera and the current configuration for image size, frame rate and image format. Clicking in this area of the infobar will bring up the camera configuration dialog.
The frame rate indicated is the one configured, the actual frame rate sent by the camera might be different for various reasons like low light levels or hardware limitations.
The second part of the infobar displays the following live statistics:

Signal (fps)
This is the frequency at which Kinovea is receiving images from the camera. The value is in frames per second.
Many cameras will reduce their frame rate based on various external factors. For example, when a camera uses auto-exposure and the exposure duration computed by the device is incompatible with the selected frame rate.
Throughput (MB/s)
This is the amount of data that passes through Kinovea as it processes the stream. The value is in megabytes per second, with the convention of one megabyte as 1024 kilobytes.
This value is related to the the image size, frame rate and format, possible on-camera image compression, link bandwidth, and possible post-processing done at the driver level.
You can use this value to estimate the necessary speed for your storage medium to write the uncompressed stream.
In the case of a non-compressed stream in RGB24 format, the value is calculated as follows:
Throughput = (width × height × 3 × frame rate) / (1024*1024)
Load (%)
This value describes how much Kinovea is struggling to keep up with the camera framerate. It is computed as the time taken to process one frame divided by the interval between frames.
When this value is near 100% it means it takes Kinovea the same amount of time to process one frame as the time budget it has for that frame, if it goes over 100% dropped frames may occur.
Drops
This is the number of frames that could not be processed by Kinovea during the current or last recording session.
If this value is non-zero, some frames are missing from the output video and any measurements involving time will not be perfectly accurate.
Context bar

The context bar contains drop down lists of context variables. It is only visible if any variables have been configured.
Context variables are used to tag the captured files with information like the name of the person being filmed, the type of exercise being performed, the equipment being used or any other relevant context.
The variables are configured from .
These variables can be used in the naming of the captured files and in the path of the capture folder to create a self-structuring file hierarchy. See Context variables.
To disable the context bar and ignore the context variables, click the identity card icon in the top right corner of the capture screen.

If the context bar is disabled but the path or name of the captured files contains context variables, the recording will be cancelled and a warning message will be displayed.
Quick status band
The quick status band is a colored band at the top of the viewport that gives a quick visual indication of the current status of the capture screen.

The color codes are as follows:
Color |
Status |
|---|---|
Purple |
The camera is not connected or there is no camera selected |
Yellow |
The camera is connected but the stream is paused |
Blue |
The camera is streaming, but the capture trigger is disarmed or in the idle period |
Green |
The camera is streaming, and the capture trigger is armed |
Red |
Recording is in progress |
If the recording has a maximum duration the quick status bar will progressively reduce in size as the recording approaches the maximum duration.
Camera viewport
The camera viewport is the main area where the camera image is visible.
The image itself can be moved around by dragging with the mouse and resized using the manipulators at the corners of the image or by using CTRL + mouse scroll. Drawings on the capture screen can go outside the image area.
If the image stays black, there might be a problem with the available USB bandwidth or power, or the exposure duration might be too short.
If nothing is visible at all, not even the black image rectangle, the camera did not connect correctly; for example, the camera might be in use in another application at the same time.
Annotation toolbar

The annotation toolbar contains drawing tools usable on the capture screen. Some tools available in the playback screen are not available in the capture screen.
Some buttons may give access to multiple tools. To access the other tools, right click the button or perform a long press on the button.
List of recently captured files
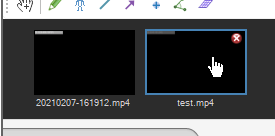
This area displays thumbnails of the recently captured files.
Tip
This area can be folded down to save space by clicking the down arrow button in the right corner of the area.
Double clicking on a thumbnail opens the file in a playback screen. The close button removes the thumbnail from the list without deleting the file.
Right-clicking on a thumbnails brings a context menu with the following options:
|
Opens the video in a playback screen. |
|
Opens the Windows Explorer on the parent folder of the video. |
|
Make the file name label editable and save the new file name. |
|
Removes this thumbnail from the list without deleting the file. |
|
Sends the file to the Windows trash. |
 Open
Open Locate in Windows Explorer
 Rename
 Hide
Hide Delete
Capture controls
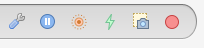
 Configure camera
Displays the camera configuration dialog to change options like the image size or frame rate.
 Pause camera /
  Start camera
Pauses or restarts the camera stream.
When the camera stream is paused it is possible to review the last few seconds of action by adjusting the delay slider.
 The view is live /
  The view is delayed
Sets the camera view to live or delayed. This is independent from the recording it only affects the view.
 The capture trigger is armed /
  The capture trigger is disarmed
Arms or disarms the capture trigger.
If capture by trigger is disabled globally this will always show as disarmed. If capture by trigger is enabled globally but it is disarmed here, trigger events will be ignored.
The trigger options can be configured in .
 Save image
Saves the image currently displayed to an image file in the selected capture folder and with the defined file name.
 Start recording video /
  Stop recording video
Starts or stops recording the video. The video is recorded based on the global format and recording mode options. It is saved in the selected capture folder with the defined file name.
See userinterface/preferences/capture for more information.
Delay and duration

The delay numerical field and slider let you adjust the amount of delay, in seconds, of the camera stream.
The delay setting can be ignored for the viewport image by using the Live view button in the capture controls. In this case the delay is still taken into account when recording if the recording mode is set to Delayed or Retroactive.
The maximum amount of delay depends on the camera configuration — hardware compression, image format, image size, frame rate — and the memory allocated in the delay cache under .
The duration numerical field let you set a maximum duration for the recording. This is the total duration of the resulting file.
Note
If delay is set to 2 seconds and maximum duration is set to 3 seconds, the resulting file will be 3 seconds long and contain 2 seconds of action before the recording button was pressed or triggered, and 1 second of action after the recording button was pressed or triggered.
Output folder and file name

Capture folder
The capture folder drop down list let you select the folder where captured images and videos will be saved.
This list of folders can be configured from . This preference page can be accessed by clicking on the folder button to the left of the drop down list.
The file name and capture folder path can use variables that are replaced by their current value when creating the file. This can be used to create self-structuring folder hierarchies for example by automatically saving in sub-folders by date and name.
Hover the mouse over the capture folder drop down to see a tooltip with the actual path target.
See Capture folders, Context variables and Capture preferences for more information.
File name
The file name field lets you define either a plain file name or a file name pattern using variables.
When using a plain file name a number will be automatically appended before the next recording to avoid overwriting existing files.
When using a file name pattern with variables, the recorded files will be named according to the pattern and the variables will be replaced by their current value.
You can configure the global default file name and insert variables in a graphical way in the preference pages .